Panda Themed Birthday Party

1

03.2.16

Panda Party

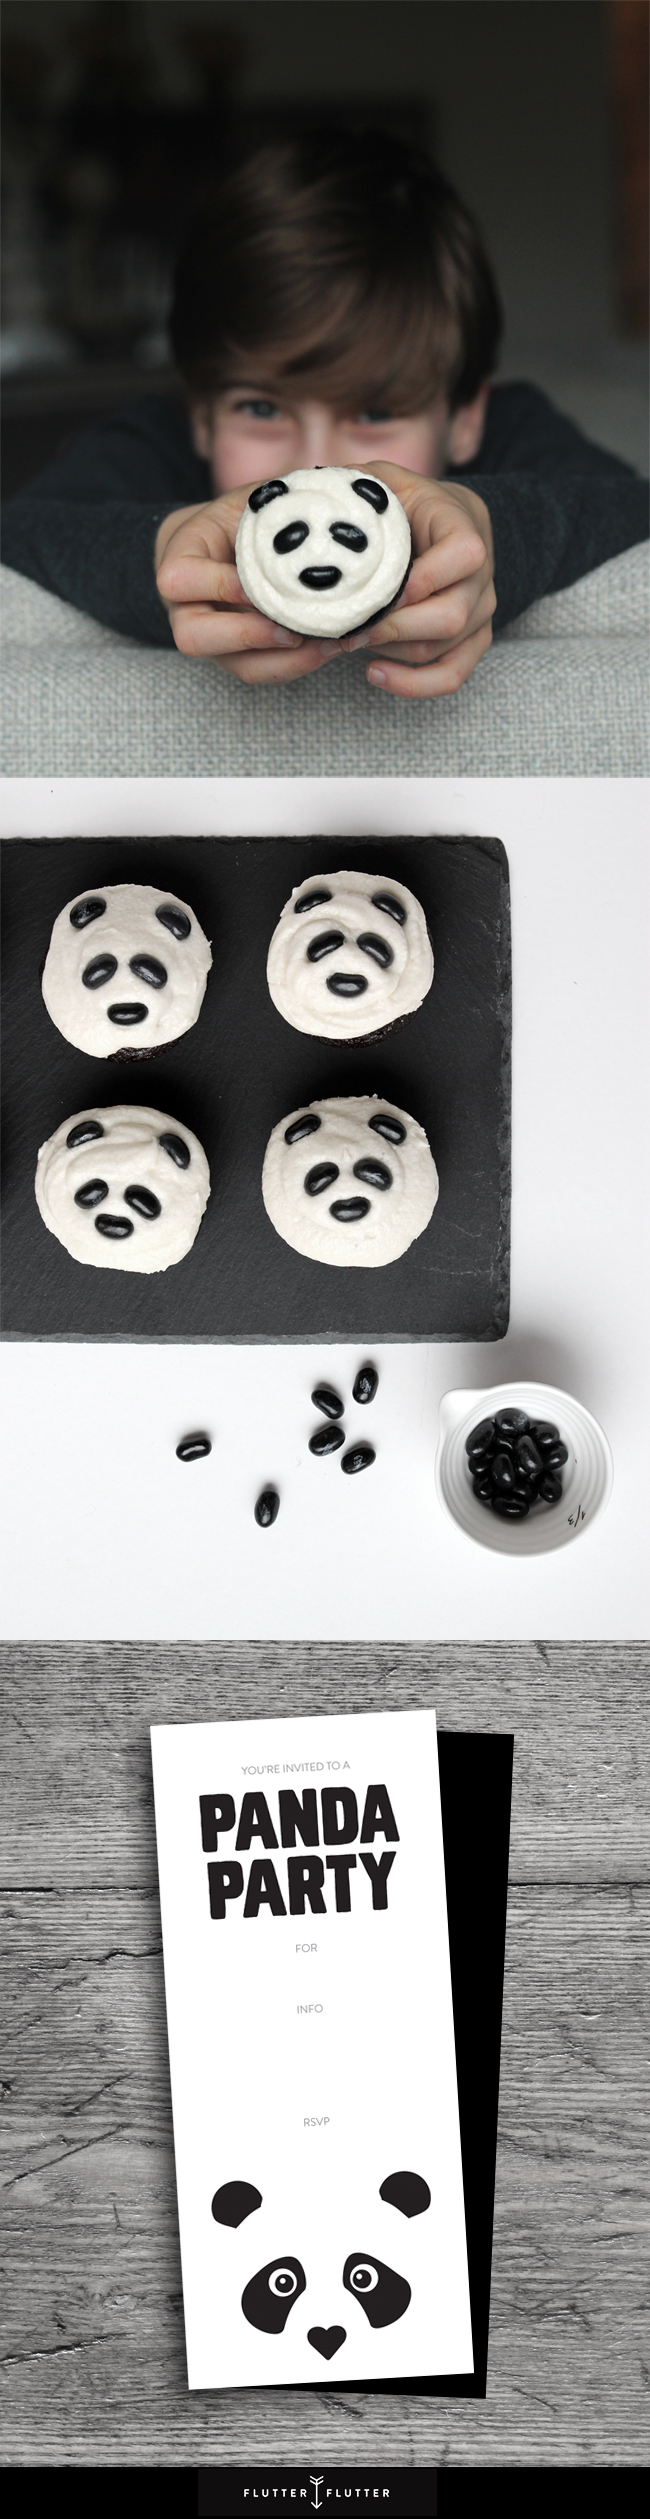
Does anyone else have a panda lover in their house? My youngest has been crazy obsessed lately! He requested a Panda-themed birthday party this year, and since he’s not going to be cool with themed parties for much longer you can believe that I was going to run with this! So, with a little help from a perfectly timed release of the Kung Fu Panda 3 movie and some jelly beans, I was able to pull it off.

I am not at all gifted with baking skills, so I always try to keep things pretty simple. I searched Pinterest for inspiration, and found lots of panda faces made of chocolate chips or fondant icing (heck no!). Basic icing and some carefully placed jelly beans work for me! I love how the curve of the jelly beans totally mimics panda eyes and ears! How has that idea not made it’s way to Pinterest already! You’re welcome people!

And, of course, what birthday party is complete without an invitation? This little heart-nosed panda invitation is now listed in the shop here so you can put together your own panda party!

Cleaning up with ChoreMonster

6

07.11.13

ChoreMonster

SpinTheWheel

Things have been changing around our house lately… it’s getting tidy! Yes, my kids are doing chores. But that isn’t new. What’s new is that they are excited about it! We’ve been using ChoreMonster for a month or so now, and since it’s working I thought I’d share it with you! To get started we created a list of chores and set some rewards, and the kids are earning points towards their goals with each chore. The real motivator is trying to win the virtual monsters, which are a huge hit with my two monsters! Unless of course our oldest wins a monster and our younger one doesn’t… but then that teaches an important lesson too, doesn’t it. 😉

Chores

Chore Monster

I’ve tried sticker charts before, and they have never worked for us. We all got bored of them pretty quick. But I’m pretty happy to see that my kids are the ones reminding me about chores most days now. I don’t have to keep them accountable anymore, they are self-motivated! Finally! If you feel like trying it out with your family, you can use this link to get ONE MONTH FREE membership. Let me know what you think if you do!

choremonster-logo

I only accept brand opportunities to write about things I love and would normally buy anyway.
I received an opportunity through Canopi to partner with ChoreMonster.

Before & After: Table & Chairs Makeover

103

28.10.13

4girlsNYC

We’ve got a visitor on the blog today! Say hello to Sam everyone! This is us at Chelsea Market on a trip to New York. Sam is second from the left, in between Sherri and Claire. It feels like so long ago, and looking at this pic makes me want to jump on a plane! But, now that you’ve met Sam, you really need to take a peek into her amazing dining room transformation!

Table Before & After

Isn’t it great! Sam wanted to change up her table and chairs, and with just a little paint that she already had on hand, and some interlocking boards, she has completely transformed the room for only $10! Pretty amazing DIY, don’t you think?

Thanks for sharing Sam!

[ UPDATE: I’ve received lots of emails with questions since this post, so I thought I’d answer them here so you don’t need to go searching through the comments if you have a question. Firstly, Sam used a couple cans of leftover FAT Paint chalk paint, mixed together, to come up with her table color. Because she was using this type of paint she didn’t sand or prime, just painted it on! She bought all of the boards in one bundle from Rona (Canada’s home improvement store) for $6! She nailed on the wood top. Hope that helps! ]

EQ3 Blogger’s Style

21

22.10.13

Kitchen

How is your week going so far? Life has definitely had its ups and downs over here lately, so it’s nice to receive emails that give me a boost. Today I thought I’d share that EQ3 asked me to be their ‘Blogger of the Month’ for October! I love this Canadian company, so of course I jumped at the chance! Over the course of the month I have posted on the EQ3 FB page, and you can pop over to the EQ3 Inhabit blog post where I share more pictures of our latest kitchen addition, the Connick Pendant. What a treat it is to have hanging over our table! It is exactly what I’ve been searching for, simple & beautiful!

KITCHEN Before & After

And, of course, everyone loves a Before & After, so I couldn’t resist sharing one including our latest addition!

Thanks for having me EQ3!

Tofino

12

16.9.13

Surfing

Orca

We’re back from Tofino, on the west coast of Vancouver Island. Well, truthfully we’ve been back for almost two weeks already, but September always seems to get ahead of me. Everyone should visit Tofino at least once in their lives. It’s just so beautiful! The sound of the waves, the smell of that fresh air… brings us back every year.

IMG_4739

Beach Time

IMG_4778

Surfing

Yes, this is our eight year old, surfing! He made it look so easy! I’m pretty thankful that hubby is such a great teacher! Lord knows that my feeble surfing skills should not be shared with the next generation.

While we were on holidays the blog was nominated for Top 25 Canadian Mom Blog of 2013! We made it to #14 last year, and I’d love it if you could head over to Circle of Moms and vote for Flutter Flutter every day until September 25th. Thank you!

Honey Garlic Crock Pot Chicken Recipe

28

12.7.13

Honey Garlic Chicken

This had to be shared. It’s just that good. It’s like pulled pork and ribs all rolled into one… only it’s chicken. And it only take a few minutes to throw together. You’re welcome.

Honey Garlic Crock Pot Chicken Ingredients

  • 2 pound boneless, skinless chicken thighs
  • salt and pepper
  • 3/4 cup honey
  • 1 tbsp soy sauce (I used Bragg’s to make it gluten free)
  • 2 diced onions, chopped into large chunks
  • 1/4 cup ketchup
  • 2 tablespoons olive oil
  • 3 cloves garlic, minced
  • 1 tbsp tapioca flour or cornstarch mixed into 4 tbsp of water
  • sesame seeds

Instructions

  1. Sprinkle both sides of chicken with salt and pepper, and place in crock pot.
  2. Combine honey, soy sauce, onion, ketchup, oil, and garlic. Pour mixture over chicken. Cook on low for 4-6 hours.
  3. Remove chicken from crock pot, but reserve sauce in the pot. Dissolve tapioca flour or cornstarch in 4 tablespoons of water and pour into crock pot. Stir to combine with sauce. Cook sauce on high for until it thickens slightly.
  4. Add the chicken back into sauce and mix to coat.
  5. Serve chicken over quinoa or cooked rice and spoon on top. Sprinkle with sesame seeds. Enjoy!

Photo by Rosa Pearson. Recipe adapted from Kitchen Meets Girl.

How to Make Spider Dogs

12

05.7.13

Spiderdogs

There is a whole lot of celebrating going on in North America lately! We just celebrated Canada Day with a sunny three day long weekend here in Canada. And I know many of you are celebrating the Fourth of July today! So, with summer in full swing and another weekend upon us, I thought this would be a good time to share a fun idea for roasting up Spider Dogs. Have you heard of these before?! They are SO much fun to make. And here I thought kids couldn’t get any more excited about eating hot dogs! I was wrong!

Spider Dog

These are really so simple. Just cut the ends of your hotdog lengthwise, creating four sections, which will become the “spider legs”. Be sure to leave at least a 1/2″ to 1″ section in the middle uncut so that you can stick in your roasting tool of choice. You’ll want to use All Beef wieners for this I’ve been told, in order to get the good curling action, but I haven’t actually tested out other types to see if they work. I do know that these hot dogs fit a lot better in hamburger buns than hot dog buns.

Fireplace

I hope you’re enjoying your summers so far! The sunshine and hot temperatures in Vancouver have been amazing lately! The local pools and beaches will be crowded this weekend! Happy Friday everyone!

Be Glad

13

15.5.13

Be Glad

I was scrolling through on Instagram today and a picture that Ez took caught my eye. It was of a beautiful tea towel from Paloma’s Nest with the words “Be glad for this moment” printed on it. Similar to the saying “Be happy for this moment. For this moment is your life.” which you may have heard before. Glad resonates with me more than happy for some reason, and those words perfectly describe how I felt when I took this picture on the beach in Carlsbad, CA a couple months ago. We sat on this beach every night so the boys could run in the waves as the sun set. Our favorite kind of holiday!

The View

But, since we aren’t going on holidays again anytime soon, I need to remember that it’s not just those moments that I need to be glad for. They are the easy ones to enjoy. It’s the everyday, mundane, and sometimes trying moments that I need to remember to be glad about. Because those are precious too. “Relax into the joy of life” as Brené Brown would say. I’m going to print out this poster and pin it up in my office to remind me.

I hope the week is treating you well so far, with many happy moments!

On a side note… I ordered a Starbucks mocha every day while we were on holidays and they were unbelievably good! I have yet to taste one that even comes close here in Vancouver! Does anyone know if the water changes the flavor? If so, I may start getting water shipped up from California to my local Starbucks. 😉 Tell me I’m not the only one that has noticed this…

Blogger Party Behind the Scenes

15

08.4.13

StyleAtHomeMay2013

I thought I’d start the week off with some exciting news! (exciting for me at least!) I was invited to attend a party in this beautiful backyard last year, and the party has made its way into this months (May issue) of Style at Home Magazine! I didn’t want to say anything until I had a copy of the magazine in my hands and saw it for myself, and now that I have I thought I’d share some behind the scenes pictures of the night that you won’t see in the magazine… so here goes!

StyleAtHome2

I’ve been to many parties since starting my blog, between media events and blogger meet ups, but this one will forever be a highlight. My friend Tracey Ayton is the amazing photographer behind all the photos for the article, and she also happens to be the owner of this lovely home! Our friend, and talented interior designer, Karla Amadatsu styled the backyard for the event and cooked up an amazing meal for all of us to enjoy. It was a beautiful evening, thanks to all their hard work, and I am so happy that I was able to be a part of it. I couldn’t resist taking some pictures on the sly with my iPhone at the end of the evening just to capture the moment.

StyleAtHome1

You can see Danielle, Karla, Victoria, Stephanie and Andrea in the pictures above, but also at the event were Barbara, Lily, Sheila, Carol, Colleen, Sari, Amanda, Michelle, and Nancy. An amazing group of talented women, that I’m happy to call friends.

Photo Credits: Top (cover) & Middle, Tracey Ayton. Bottom two, Rosa Pearson.

Making Juju Hats

9

04.3.13

Hot Pink Juju

Chartreuse Juju Hat

Working away on custom juju hat orders lately for some Etsy customers. Hot pink, chartreuse, and turquoise are in demand right now with Spring around the corner. And for those of you confused by the name, no, they aren’t hats, they’re wall art.

Welcome back from the weekend! I’m so happy that we had a sunny Sunday here. I needed a break from all the rain!

PS – If you’re new here, and are interested in making one for yourself, you can check out the Faux Juju Hat Tutorial I posted way back when. I’ve refined the process a lot over the years, so they are a lot less “crafty” looking now, but you’ll get the general idea.

Theme by Blogmilk   Coded by Brandi Bernoskie